
Appearance
Fundamentals
This section introduces the core technical concepts behind Noa Notes Integration. Understanding these principles will help you build a reliable and production-grade integration between your PMS and Noa Notes.
Integration Architecture Overview
Noa Notes Integration is composed of:
- DocPlanner NOA Notes Integration REST API
- Embeddable NOA Widget (UI)
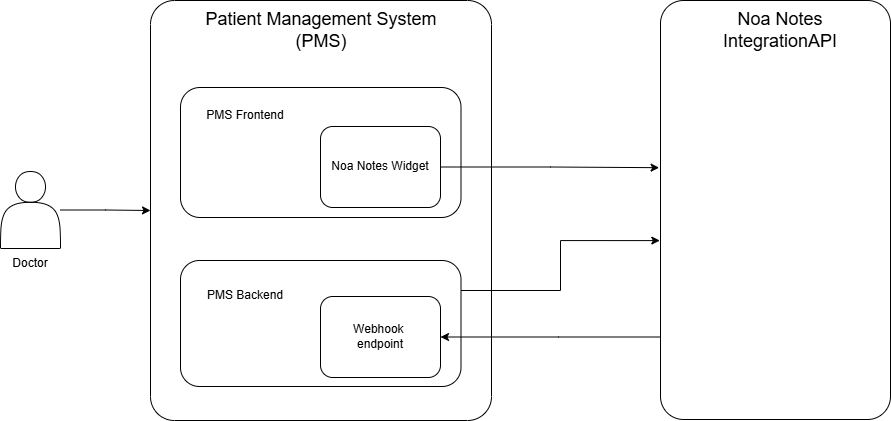
In addition to the above we offer the following:
- Token-based authentication
- Webhooks for real-time updates The typical flow looks as follows:
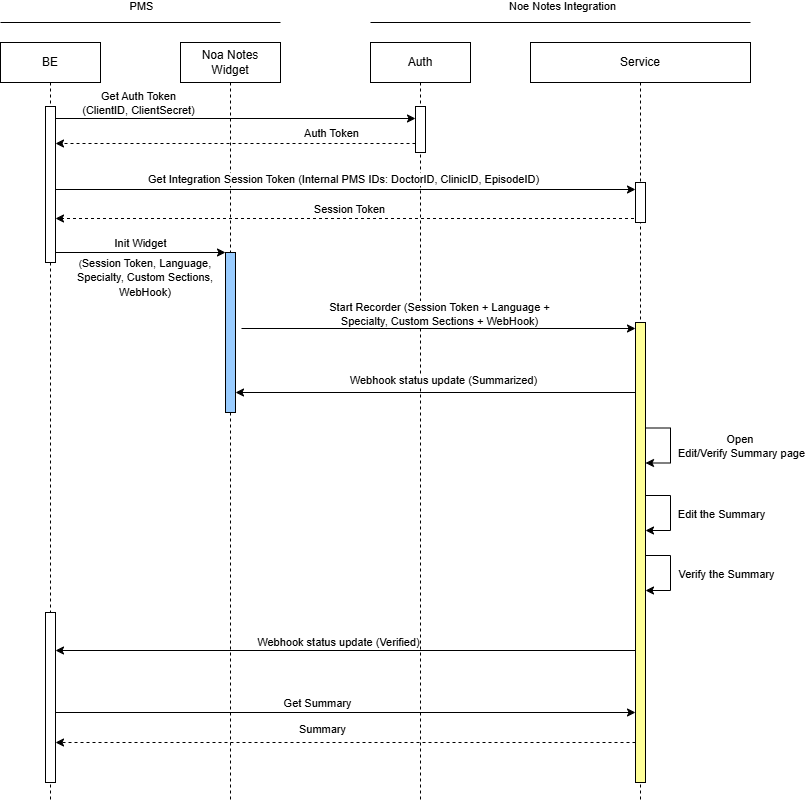
NOA Notes Integration Flow
Follow these steps to implement the NOA Notes workflow within your system:
Authenticate via API
Use the providedclientIdandsecretto authenticate with our API.
This will return a Bearer token required for accessing the/consumers/*endpoints.Create a Session
Use the Bearer token to create a new session for the appointment via the/consumers/sessionsendpoint.
This call will return a Session token used to access the/sessions/*endpoints.Render the NOA Notes Widget
Embed the NOA Notes widget in your PMS frontend using the session token.
This enables doctors to interact with the widget during the consultation.Record and Review Consultation
Allow the doctor to start recording, review the AI-generated transcription, and approve or edit as needed within the widget.Track Session Status via Webhook
Implement webhook listeners to monitor session status changes (e.g., started, completed, reviewed).Retrieve Summary and Populate EHR
After session completion, retrieve the AI-generated summary and use the provided data to populate the patient’s EHR using your pre-defined template.
Live Environment – Country-Specific URLs
For live usage with real patients
| Country | Locale | Base URL |
|---|---|---|
| Poland | pl | https://integration.notes.pl.noa.ai/api/v1/ |
| Germany | de | https://integration.notes.de.noa.ai/api/v1/ |
| Spain | es | https://integration.notes.es.noa.ai/api/v1/ |
| Portugal | pt | https://integration.notes.pt.noa.ai/api/v1/ |
| Czech Republic | cz | https://integration.notes.cz.noa.ai/api/v1/ |
| Türkiye | tr | https://integration.notes.tr.noa.ai/api/v1/ |
| Italy | it | https://integration.notes.it.noa.ai/api/v1/ |
| Argentina | ar | https://integration.notes.ar.noa.ai/api/v1/ |
| Brazil | br | https://integration.notes.br.noa.ai/api/v1/ |
| Chile | cl | https://integration.notes.cl.noa.ai/api/v1/ |
| Colombia | co | https://integration.notes.co.noa.ai/api/v1/ |
| Peru | pe | https://integration.notes.pe.noa.ai/api/v1/ |
| Mexico | mx | https://integration.notes.mx.noa.ai/api/v1/ |
It is strongly recommended to choose the service located nearest to you.
Consumers
A Consumer is a PMS system registered in Noa Notes. Each Consumer has its own:
- Default Webhook URL for status updates
- Default language of the notes
- Default template for the notes
- Default specialty of a doctor
These defaults are configured by a Docplanner specialist during onboarding.
You can retrieve your current configuration via:
GET /api/v1/consumers/me
Authorization: Bearer {accessToken}
Default values are automatically applied when optional parameters are not provided during session creation.
Sessions
A session represents a single use of Noa Notes and expires after a set time. To get a Noa Notes Recorder URL and widget displayed, the client must first create a session. This URL allows the doctor to access the recorder. After the session, a summary of the appointment is generated and should be used to fill in EHR data in the client app.
Authentication
All API requests must be authorized using an access token obtained via client credentials.
Key Concepts
- Access is restricted to registered PMS clients
- Authentication is stateless (no sessions or cookies)
- All communication must be over HTTPS
- Tokens are short-lived, tied to the Consumer, and not user-specific
How to Get an Access Token
Endpoint: POST /api/v1/auth
Request:
json
{
  "clientId": "your-client-id",
  "secret": "your-client-secret"
}
Response:
json
{
  "accessToken": "string",
  "expiry": 3600
}
Use the token in the Authorization header for all protected API calls:
Authorization: Bearer {accessToken}Token Errors
| Status | Description |
|---|---|
401 Unauthorized | Token is missing or invalid |
403 Forbidden | Token is valid but lacks permission |
Error Handling
We use standard HTTP status codes:
| Status Code | Meaning |
|---|---|
200 OK / 201 Created | Request succeeded |
400 Bad Request | Missing/invalid request body |
401 Unauthorized | Invalid or expired token |
403 Forbidden | Valid token, but action not allowed |
404 Not Found | Resource doesn't exist |
500 Internal Server Error | Server-side error |
All responses include descriptive error messages to help diagnose issues.
Fair Usage Policy
To maintain system integrity and prevent abuse, we enforce the following rule:
One Active Session per Doctor
A doctor can only have one active session at a time.
This reflects the real-world workflow: doctor - patient - appointment.
If a second session is created for a doctor while another is still active:
- The API will return the current active session
- The first session must be closed or expire before a new one can begin
Best Practices
- Always track the session status using a webhook or the
GET /sessions/{id}/statusendpoint - Prevent your frontend/backend from unintentionally creating duplicate sessions